
Optimizing Hardware Development to be More Agile
So how do you make hardware development more Agile? In this part, part 5, we examine Agile's 3 and 7th Principles and how they apply to hardware product development and look for ways to make hardware development more Agile.
Agile principles 3 and 7 are as follows:
Agile Principle 3: Deliver working product frequently, from a couple of weeks to a couple of months, with a preference to the shorter timescale.
Agile Principle 7: Working product is the primary measure of progress.
Agile Principle 3
The third principle of ‘delivering working product frequently’ is common Agile practice and is known as "sprints." At the end of each sprint, a working product is delivered. It doesn’t do everything, but it can do something new or better – successfully - every couple of weeks. However in hardware, delivering a working product every two weeks seems impossible.
In fact, it seems pretty obviously impossible -- and our component lead times stick out as a primary reason.
However, rather than stating the obvious and leaving it at that, we’ll go deeper, because within these two principles lies a key to understanding hardware and software product development systems as a whole. Unfortunately, it’s a longer explanation than I can fit into one post, so I have split the discussion into two posts.
Before I get to that, though, I’d like to note many aspects of sprints are very beneficial in hardware development, as we will discuss when we look at specific Agile practices. For now, though, we’ll examine only the "working product" aspect of this principle.
What is a working product in hardware development?
To discuss principles three and seven, we’ll need a common understanding of what "working product" means. The definition of ‘working software’ in Agile development is not particularly universal or clear. Some say it should be deployable, and some say it only needs to demonstrate. For this discussion at least, I will establish a definition of my own. I will start by examining the purpose of delivering working software. Why is working software so valuable in Agile that it is part of two principles and the main indicator of progress?
If you have been reading my blog posts on economic decision making and Cost of Delay, you know I prefer defining value quantitatively -- in terms of dollars profit (usually, not exclusively). The value of 'working software' is no different.
The value of working software
There are two big ways that working software can produce value. Firstly, if it is deployable it can impact our profits directly. Either we can sell it or we can release it to existing customers in return for maintenance revenue or to increase their satisfaction and the probability of future sales. In these cases, there is a direct correlation between ‘working software’ and value (profit).
The second big way ‘working software’ can produce value is that it enables us to find the issues that can’t be easily discovered until people outside the development team -- especially customers -- actually use it for a while. This important feedback can also come from senior management, marketing, sales, and others, but only if we have software that is ‘working’ well enough that people can actually use it.
These are the ‘unknown unknowns’. They include hidden bugs, yes, but more importantly they include errors within our requirements that might completely blow our profits out of the water if we find them too late. There is a lot of value to finding errors in our requirements earlier, before we spend a lot of time designing, building, testing, and marketing a product that people won’t happily buy.
Note, that we achieve value from both feedback and revenue if we have deployable software, but we can realize the value of the feedback before we launch. Because most of the value of ‘working product’ comes from either sales or feedback about requirements we need to add or change, I use these to define it.
A ‘working product’ is a physical object which internal and external customers can use well enough to happily pay for it or to provide good feedback about it.
There are other benefits of frequently producing a working product. It keeps technical debt lower, makes future problems easier to find, and helps keep the team and other stakeholders engaged. However, this definition can provide those benefits as well.
Note, software is a ‘physical object’ when it appears on a screen in front of us in working order. For hardware, it is a part or an assembly of parts.
It doesn’t do everything we have planned yet, but it can do something successfully. There may be some bugs in it, but they do not prevent us from realizing value in sales or feedback. In fact, ‘working product’ is measured by the severity of the bugs in it, where severity is measured by how much the bug impedes feedback or impacts customer satisfaction.
Design-Build-Test cycles
In both hardware and software development, we walk the same Design-Build-Test (DBT) path to working products and profits. However, these terms mean different things in hardware vs. software.
For example, in software, ‘build’ usually includes writing code. For the sake of this and later discussions, and to draw a good analogy between software and hardware, I package things a little differently.
The Design step involves creating and putting into place these analogous things:
Software vs. Hardware
User Story ~= Detailed Design Requirements
Mockup ~= CAD Model
Function ~= Piece Part (designed, not yet physical)
Line of Code ~= Single Part or Process Specification (e.g., a dimension)
I put coding into design for several reasons. Like developing part specifications, it is sometimes an iterative process which impacts our breakdown of parts/functions or our detailed requirements/user story.
I also put coding into design because it is where most of our critical resources’ (engineers) time is spent. After design/coding there are often handoffs from the engineers to procurement, quality, test technicians, or automated testing. Lastly, I put coding into design because, like developing part specifications, it is where we create many of our errors.
In my analogy, I include component procurement and product assembly within the Build step. This includes the time it takes to release documents, get quotes, have purchase orders signed off, and everything else from when ‘design’ is complete until the test can begin. For software processes, build includes compiling our code and working out any critical integration errors. Build also includes installing our code on whatever devices(s) we use to test it.
(Side note: Certainly user stories and detailed design requirements are different, and the differences are very important, but we will discuss these when we discuss the practice of User Stories.)
Smaller Batch Sizes
For those who have read our posts on Applying Lean Startup Principles in Manufacturing, specifically the one presenting the paper by Sang-Don Lee of General Motors, which quantifies the benefits of smaller DBT cycles, you have seen this picture before.
It also appears in Don Reinertsen’s, Managing the Design Factory, and in a different form in his book, The Principles of Product Development Flow: Second Generation Lean Product Development.
When we design, we create detailed requirements, and then some detailed part and process specifications (or some code in software). Some of these requirements and specs (lines of code) have some errors that we discover when we test it.

Figure 1: Undiscovered error population and DBT batch sizes
We reduce our DBT batch size by reducing the number of requirements we attempt to satisfy before we test. By doing so, we get to test earlier and keep the undiscovered error queue (unknown unknowns) smaller. This helps us diagnose and address issues faster and with better focus. More importantly, we learn earlier where our unknown unknowns are, which ultimately helps us complete our projects much faster.
This depiction is a simplification in two ways. First, we cannot usually discover every error in a single testing period, especially if there are a lot of them. Undiscovered errors don’t really go to 0 until we get through at least a few DBT loops, unless we already have really small batches. Also, in this depiction, ‘build’ takes a negligible amount of time. In hardware where procure is included within build it is hardly instantaneous, which makes a big difference.
Design-Build-Test Cycles in hardware
I offer a modified version of these graphs for illustrating the concept of working product and the differences between software and hardware. Rather than looking at undiscovered errors which go away immediately upon discovering them, let’s look at total remaining errors which only go away when we fix them. I also include some time for the build.
There are two types of errors – the ones we can see through internal testing and the ones we cannot. Internal testing finds most of the defects or bugs (design and process errors) and some lower-level requirements errors. We can usually fix these relatively quickly and easily. External testing (including sales and post-sales support) is where we usually find the higher-level requirements errors which cause big changes to our products and projects.
The errors we can see internally are what defines whether we have a working product or not and this is what I depict below.
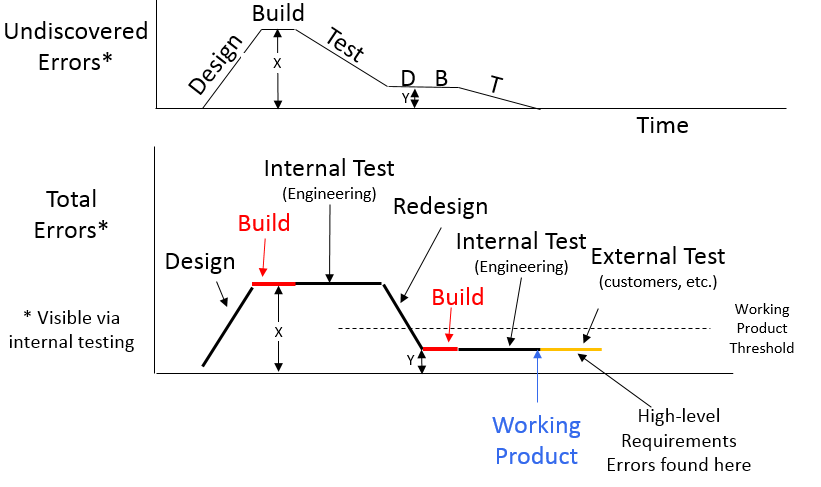
Figure 2: Total Errors and DBT cycles
These images depict a simple case where we achieve a working product in two iterations. First we decide what the product should do (and/or what the test should test), what pieces we need, and what those pieces look like (Design). Then we get the pieces and put them together (Build). Certainly sometimes we discover errors during build, especially in hardware products, but in this example our build doesn’t reveal any errors.
Then we test them internally first, among the small engineering team who did the design. The first test reveals a few defects (X-Y) but does not reveal a couple of them (Y). Some of the errors found are too severe to qualify as working product (the ones above the working product threshold line), and some aren’t (the ones below it). We fix them all (Redesign), and build and test internally again. This time we find the remaining errors (Y), but they are not too significant and we can call our product ‘working’.
We can see in the graphs above that the longer it takes to build (the longer the red line gets), the fewer DBT iterations we can go through in a given amount of time. Even with an 8-week sprint, and even if we could procure parts in 2 weeks (relatively quickly), that only leaves us 4 weeks to do all of the design, assembly, test, redesign, reassembly, and retest. Maybe, we can do that if we only need two iterations to get it ‘working’ but we usually need more. Innovation is what sells, and we can rarely innovate in only two iterations.
How do we achieve working software, frequently?
To see the third principle in action in software development, let’s consider a software example in more detail. In this example, we have three features to develop (user needs to satisfy). They are each about the same amount of work to develop and test. Also each one contains about the same high level of innovation, so we need five iterations to find all of the severe defects and get the product working.

Figure 3: Total errors in big-batch software development
By de-batching these features we achieve working product more quickly, as shown in the picture below. Since working product has value to it we achieve this value much earlier.

Figure 4: Total errors in small batch vs big batch software development
By reducing the number of features we build and test, we reduce the length of each black line proportionally, as shown in the blue lines. 33% of the requirements take approximately 33% of the time to design, test, and fix. The red ‘compile and install’ line doesn’t necessarily get shorter, but because it is so short already, we can just keep chunking down the work into smaller and smaller sets of requirements until we can fit it into a sprint-sized time box.
Why can’t we do this in hardware development?
In hardware, the picture is essentially the same with one enormous difference. Instead of a short ‘Compile and Install’ step, we have a relatively long ‘Procure and Assemble’ step.

Figure 5: Total Errors in big batch hardware development
What happens in hardware development if we simply tackle fewer requirements in each iteration? As in software development reducing the number of requirements we attempt to satisfy does make the black ‘Design & Document’ line shorter. However, because of the naturally higher level of integration in hardware development, this line often doesn’t get proportionally shorter. Even if we strive for a working product which satisfies only 5% of the requirements, we often still have to design and procure 50% of the parts.

Figure 6: Total errors in small batch vs big batch hardware development
When reducing requirements, we also shorten the black ‘test’ and ‘redesign’ lines. Fewer requirements mean fewer tests so the 'test' line shrinks proportionally. However 'redesign' often still involves a large percentage of highly integrated components, so this line doesn’t usually get proportionally smaller.
However, the biggest difference is apparent in the red procure and assemble lines. While the black lines get shorter with fewer requirements, in many cases the red lines don’t. Consider a circuit board, for example, which takes about two weeks from a good prototype shop if all of the components are easily accessible and the purchasing process goes quickly. That board with half of the capabilities will still take about two weeks to procure.
Our ability to reduce procurement time is limited
There are cases where reducing the number of requirements does shorten the red line, too. For example, if we defer the requirements to have correct mechanical and electrical properties and aesthetics, we can make our parts with 3D printers. In many cases we can get good information a lot earlier by deferring some requirements and getting parts faster. This is one of the keys to earlier learning and faster product development.
However, in every case we are limited by the length of time it takes to get the parts we need for a good test.
In general, this step is still days or weeks for most iterations where "compile and install" usually takes minutes or at most a few hours. In fact, reducing compile and install time is critical to Agile software development. It just isn't that simple for hardware development.
This changes a lot about how we best develop our products, and how quickly and frequently we can achieve working product. It increases the optimal amount of design we really should do before we procure, and it makes managing our product development activities quite a bit more complicated.
Implications for hardware development
So, now that we have a picture for why working hardware products don’t intuitively fit into short sprints. It is the lead time combined with a higher-level of integration and the need for a greater percentage of pieces to make a working product.
In software we can -- almost without limit -- continually ‘chunk it down’ further into fewer and fewer requirements to shrink our DBT batches and attain working software every few weeks, and certainly there are big benefits to doing so.
However in hardware we are limited in how much we have to gain by addressing fewer requirements with each iteration. We may save a little time in each iteration, but we can lose more time than we save by needing more iterations to complete the remaining requirements. So what do we do then?
The first thing we do is recognize the enormous value of getting earlier feedback that exposes errors in our requirements. If we charge forward too long without this feedback, we often waste a lot of time and money developing things that weren’t valuable anyway. We have to do something to get this feedback earlier. To get it people need to see it and try it with real parts.
Of course, there is more to all of this. Stay tuned for the next post, where we will look more at how to optimize our hardware development system around the different shape of its DBT cycle. We will also look at the application of the seventh principle and how we best measure progress in longer DBT cycles.
Download the eBook Agile for Hardware and share these concepts with your team.

----
Related articles
Agile Development
Applying Agile Values to Hardware Development
Agile Principle 1: Early and Continuous Delivery of Value
Agile Principle 2: Welcoming changing requirements
Making Hardware Development More Agile
Early Learning in Hardware Development
Agile Principles 4 - 12 to Hardware Development
Guide to Kanban
Guide to Applying Agile to Hardware Development
